Monday, September 30, 2019

Magnolia Embossed


Once I was head over heels for the Magnolia Lane suite I knew that I wished to add the Magnolia 3-D embossing folder to my stash of tools.


I sat down to create cards this weekend and used the embossing folder for the first time!!! Why did I wait so long?  The folder on it's own creates a stunning background but when you add a bit of colour, the image just pops!


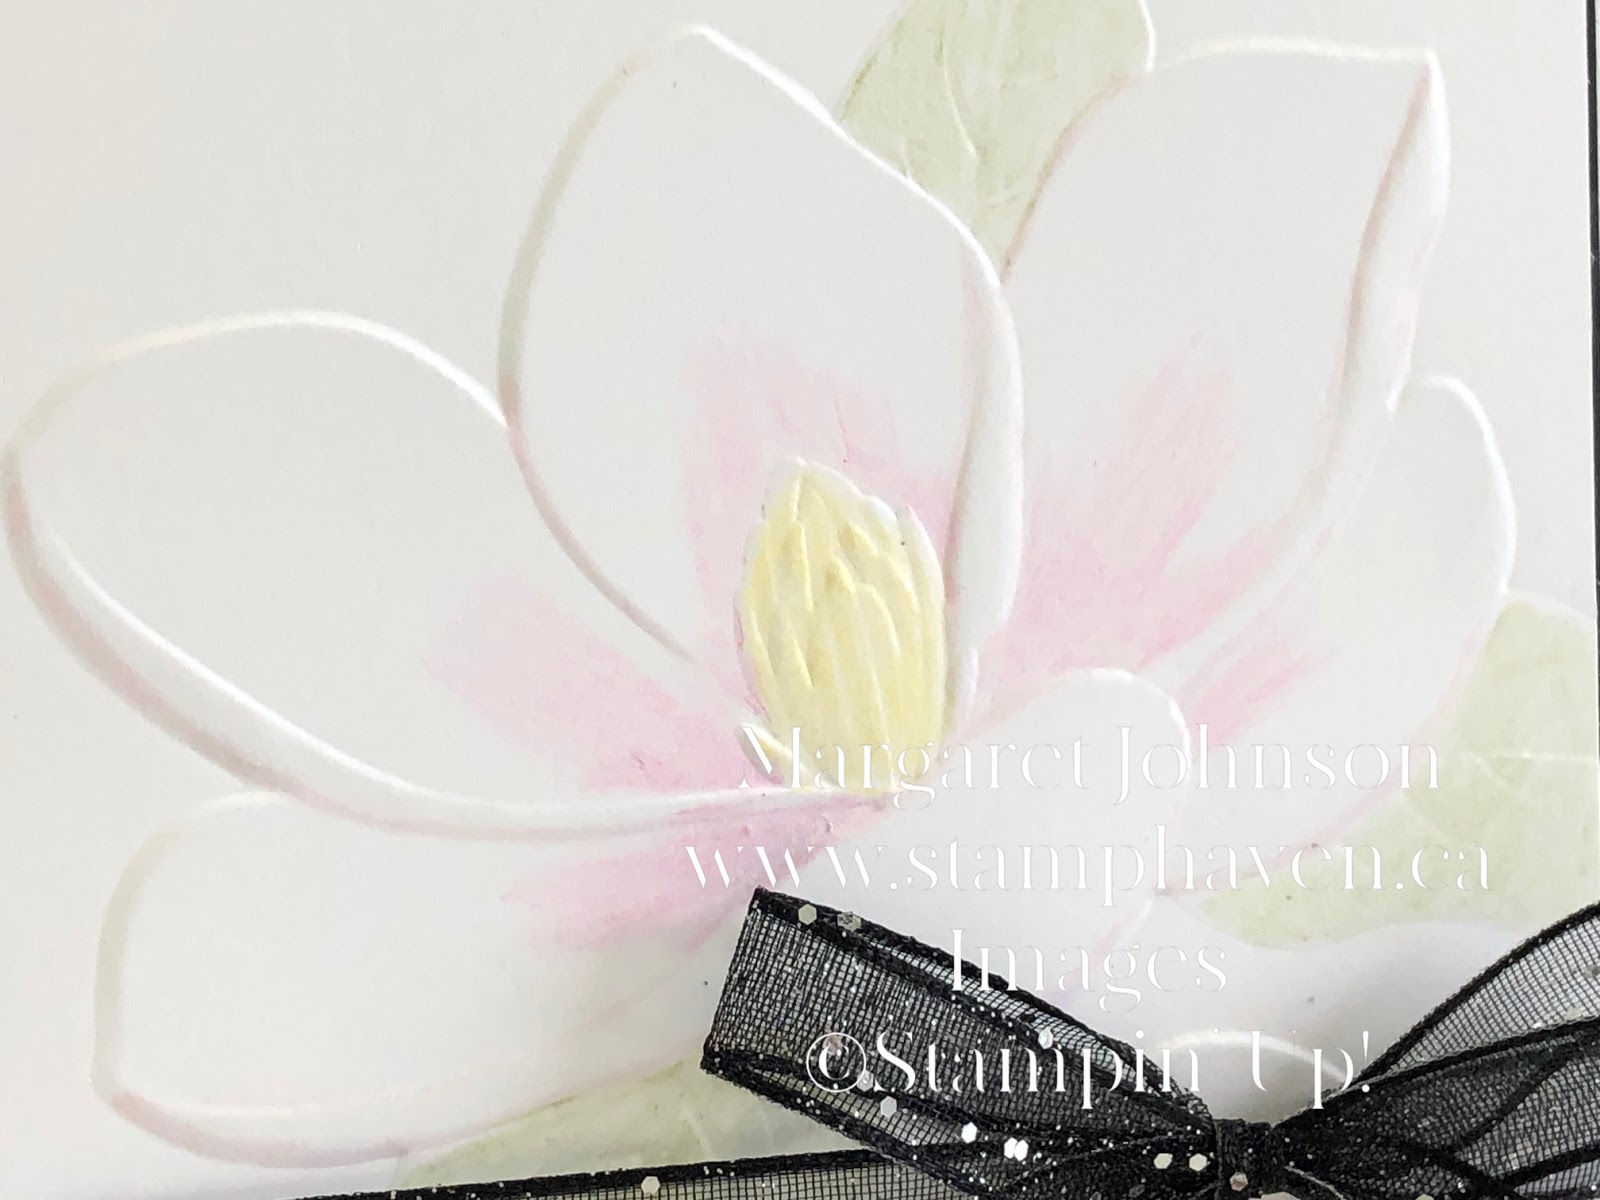
I used Stampin' Up! Watercolour Pencils and a Blender Pen to add most of the colour, however I also used a Stampin' Blend to add just a hint of colour to the some of the edges of the flowers petals. I found this extra touch made the petals just pop!


I layered the embossed panel onto Basic Black cardstock that was barely larger than the cardfront. It gave just a hint of a shadow effect and to tie in the black colour, I used the Black 5/8" Glittered Organdy Ribbon. This ribbon is so beautiful!!! You will love it!

Next card I create using this will be a coloured cardstock so you can simply see the lovely effect the embossing folder creates on a card front :)

What is your favourite embossing folder to use?

Until next time!
Margaret 


Thursday, September 12, 2019

Magnolia Note Cards


No one ever said that cards had to be more than one layer.  If you are a beginner stamper you can start with a few simple supplies.

Today's design will show you how you can make cards with very few items. (note: I did use one sentiment from another set but you can easily make a set using only the sentiments from the Good Morning Magnolia stamp set.)


Supplies used:

  • Note Cards & Envelopes(used here are retired Crumb Cake) 
    • current available colours are Whisper White (131527), Very Vanilla (144236), Scalloped Note Cards (149610)
  • Good Morning Magnolia stamp set (149298)
  • Clear Block F (118483) & D (118485)
  • Soft Suede Ink (147115)

Simple steps to create:
  1. Fold Note Card in half
  2. Ink up large magnolia image using Soft Suede ink and stamp on card front
  3. Ink up sentiment you wish to use in Soft Suede ink and stamp on card front.
That's it and don't they look great! 

No one said you needed to break the bank to make cards :D

Until next time!
Margaret 


Tuesday, September 10, 2019

Most Wonderful Time Product Medley Tutorial Bundle


The new Holiday Catalogue 2019 features many great products to get you in the Holiday spirit. One such item is the Most Wonderful Time Product Medley (150705).  Purchase the Product Medley through me and receive a digital tutorial with 15 different projects*! The image above is a sneak peek :D  This is such a great way to get a jump start on all your holiday gift giving and card making needs.  

The Most Wonderful Time Product Medley includes stamps, paper, dies, and accessories that are perfectly coordinated for creating cards and more. A product medley is similar to our cardmaking kits and other project kits but without the predetermined projects. Also available in French and German.

Medley includes
* 11-piece photopolymer stamp set (clear blocks sold separately)
* 48 sheets of 6" x 6" (15.2 x 15.2 cm) Designer Series Paper, 8 each of 6 double-sided designs
* 12 gold foil card fronts, 4 each of 3 designs
* 6 sticker sheets, 2 sheets each of 3 designs
* Gold/white tinsel trim, 10 yards (9.1 m)
* 58 adhesive-backed gold faceted stars
* 6-piece Most Wonderful Time Dies (use with a die-cutting & embossing machine).

Product colors: Basic Black, gold foil, Old Olive, Real Red, white


Be sure to order soon so you have plenty of time to get all your crafting in before December arrives!!!

You'll love the projects featured in this tutorial package!!!

You may order the Medley directly from my on-line website at www.margaretsstamphaven.stampinup.net.  Be sure to allow your contact information to be visible to me so that I am able to share the tutorial with you <3

Until next time!
Margaret 


*Digital tutorial is solely for the use of the person who has purchased the Most Wonderful Time Product Medley directly from me.  You agree not to share this tutorial in any way, shape or form with anyone else.


Monday, September 9, 2019

Gone Fishing

I didn't jump on the Best Catch bandwagon right away when the set came out. Don't get me wrong, I really liked it and know some people who fish but I wasn't sure if I would end up using it as much as perhaps I thought I should.  As you can see though, I did break down and buy it.  The dies that coordinate with the stamp set certainly help make the card creation process so much easier. 


As I often do with other coordinating sets, I stamp, colour and die cut several images. From there I will design and build a card.

If you don't already own any of the Stampin' Blends, I highly recommend them.  The more you work with them the better you will get at blending, shading and simply colouring overall :D


As I am not always confident in my colour choices I did the one thing many of us do....I googled images of fish and other peoples creations to see how some of the fish looked.   I love using lots of colour as I find it brings the fish to life!!!


Now I truly appreciate the Copper Trim as this ribbon adds a perfect shimmering touch to just about any design.  When using it on a fish card such as, by simply stretching the ribbon out it looks a bit like a fish net. A simple yet cool technique.

Since this card says "For You, Dad" you could use if for any occasion really - birthday, fathers day, just because!! <3

Do you own this set already? Have you taken the time to sit down and create with it?

Until next time!
Margaret