Showing posts with label Magnolia. Show all posts

Monday, September 30, 2019

Magnolia Embossed


Once I was head over heels for the Magnolia Lane suite I knew that I wished to add the Magnolia 3-D embossing folder to my stash of tools.


I sat down to create cards this weekend and used the embossing folder for the first time!!! Why did I wait so long?  The folder on it's own creates a stunning background but when you add a bit of colour, the image just pops!


I used Stampin' Up! Watercolour Pencils and a Blender Pen to add most of the colour, however I also used a Stampin' Blend to add just a hint of colour to the some of the edges of the flowers petals. I found this extra touch made the petals just pop!


I layered the embossed panel onto Basic Black cardstock that was barely larger than the cardfront. It gave just a hint of a shadow effect and to tie in the black colour, I used the Black 5/8" Glittered Organdy Ribbon. This ribbon is so beautiful!!! You will love it!

Next card I create using this will be a coloured cardstock so you can simply see the lovely effect the embossing folder creates on a card front :)

What is your favourite embossing folder to use?

Until next time!
Margaret 


Tuesday, May 28, 2019

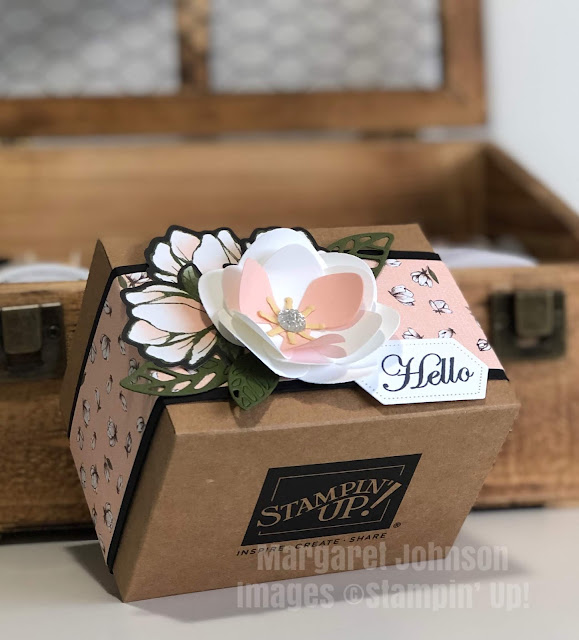
Mini Shipping Box - Belly Band Seal

I can't believe this is the last week for the current annual Stampin' Up! catalogue and next week you all have the opportunity to begin purchasing new products from the 2019-2020 Annual Stampin' Up! Catalogue.  The fun continues for me with creating projects using the Good Morning Magnolia set and the Magnolia Memory Dies.


I chose to create a different project today and so I used the cute Stampin' Up! Mini Shipping Boxes that will be available in the new catalogue.


I really didn't want the box sealed where the recipient would have to damage the item when they open it so a belly band was the perfect solution as a seal.


The possibilities of designs for belly bands are endless but I do find the white and pink colours of the magnolia go so well with the craft colour of the boxes.

The Magnolia Lane designer series paper has so many great patterns that it took me a bit to settle on which pattern to use for the belly band itself.  I attached this to Basic Black cardstock to allow the designer paper to stand out.


Die cutting the smaller magnolia image from one of the sheets of designer paper was a no brainer for me to add some great colour to the project.


I still needed depth for this project, so I die cut the magnolia petals and stamen, layering them using Whisper White, Petal Pink and So Saffron cardstock.  To create dimension I used a Bone Folder to curl the petals.  Once all layers were ready I used SNAIL adhesive to attach each layer together.


Of course a project is never really complete until some type of bling is added.  This is where the Clear Faceted Gems came in handy.  I added a medium sized gem to the centre of the flower. Let's not forget about the cute sentiment.  'Hello' was stamped in Memento Black ink and die cut using the incredibly versatile Stitched Nested Label Dies.


Flowers never seem to appear right unless they have some leaves and the sweetest leaves are die cut using the Magnolia Memory dies.  Did you know that the set includes two identical larger and two identical smaller leaf images?  This is great for mass die cutting.  You get twice as many cut in the same amount of time it would take you to die cut one set.


The boxes are larger than I thought they would be and will be perfect for adding mini note cards inside as a little thank you gift for a hostess or even a unique birthday gift for a special friend.


What would you put in these adorable Stampin' Up! Mini Shipping Boxes?

Until next time ~
Margaret 


Wednesday, May 15, 2019

A Mothers Love

Okay, so I am going to do this to you two days in a row!   After this card, I am done sharing Mother's Day cards with you (for awhile at least).

Yesterday I shared with you the card I made for my mom for Mother's Day and today I am sharing a card that I made for my oldest daughter.  She became a mom on Christmas Eve 2017 and she works hard to ensure her little guy is cared for, loved, nurtured, fed and safe.  She is a wonderful mom and I wanted to be sure she knew how proud we are of her.

I spent nearly 2 full hours creating this card for her because I wanted it to be just right! From the cardstock colour on each layer to the placement of each Pink Pearl.


There are many small details that you may not even notice at first glance but lets take a walk through this card and have a look.

So the very first thing I did was stamp, colour and die cut the large magnolia image from the Good Morning Magnolia stamp set. The outline was stamped using Soft Suede ink.  Then I used my Stampin' Blends to colour in the flower.  If you're not aware, Stampin' Blends are alcohol based which means you need to stamp your outline in a waterbased ink so that the lines don't disappear while colouring.


I used a few colours (both light and dark Blends) to achieve this result:

  • Petal Pink 
  • Old Olive
  • Crumb Cake
  • Daffodil Delight
Now I won't lie, I don't feel I'm the best at colouring images, but I am super proud of how well the flower turned out.

My next step was deciding on the card base colour.  I chose Crumb Cake as it is such a perfect neutral colour and helps tie in the Crumb Cake branch in the image.  I added a second, slightly smaller layer of Crumb Cake cardstock but for this layer, I added some embossed line details.  Do you know, it has been so long since I used my Simply Scored tool that I had to check to see if it was still available for purchase in the catalogue!  I pulled that bad boy out and used it to create the line details.


I had planned to use the gorgeous Magnolia Lane Designer Series Paper but I found it too busy or not the right balance of pattern and colour to go with the magnolia image.  Back to the drawing board I went and decided to try out a few different colour cardstocks, embossed using the Subtle Texture Dynamic Embossing Folder.  I picked the Petal Pink as the right fit for this card.


Next was ribbon and while this particular ribbon has been retired for years, I really wanted to use the old Victorian Lace (I believe that was the name of this particular design).  Next, I took 1/8" braided Linen Ribbon and pulled apart the braid, leaving the ribbon looking like loose threads.  I adhered these bits under the die cut magnolia image for an added vintage touch.


Of course I wanted to add a Mother's Day Sentiment so I stamped the Happy Mother's Day from the set Tea Together using Memento Black ink and die cutting using the Stitched Shapes Framelits. 


The final touch on this card was the Share What You Love Pearls. Soft and delicate, not overwhelming.


I don't tend to make such "detailed" cards, shall we say and while this card took me a couple hours to make, I am so proud of the finished product.

What is the longest amount of time you have spent making one card?

Until next time.
Margaret 


Tuesday, May 14, 2019

Mother's Day... celebrating my Mom!

How blessed we are to celebrate our Mother! While those of us who still have a mother in our lives are fortunate to spend time with them, I also feel for those who have lost their mom and struggle on this day.

My husband and I took my parents out for a nice dinner on Saturday evening.  Really after nearly 80 years, what does your mom really need other than her childrens time?

Now since I love making cards, and even though my mother by her own admission to me in the past told me that she does not keep my cards, I sat down Saturday morning to create a special card just for her.

Now I don't really want to tempt or tease you with products from the new 2019-2020 Stampin' Up! catalogue just yet, I also don't want to wait a few weeks just to show you Mothers Day cards. So don't get too excited over these products yet because I still have plenty of projects to share with you using retiring items.

For this card, I used the Magnolia Lane Memories and More Card Pack.  I was going to use the Magnolia Lane Card and Envelope pack as well but couldn't bear the thought of covering up the silver outline on the card base.


The leaf layer that is attached to the Whisper White Large Memories and More card base is actually printed Vellum!  This paper is sooooo pretty.  The images were simple black outlines, so I added colour to the leaves by using Old Olive Stampin' Blends.

You may have noticed that I do like to use the stamp set Well Said that coordinates with the die set Well Written.  These products are available in the current Occasions catalogue as a bundle at 10% off. Just a reminder that while these products will be carried over to the new catalogue, they will no longer be available as a bundle at the discount, so if these are on your wish list, I recommend ordering them now ;)


I stamped Mother's Day and die cut the word Happy and added them to one of the smaller designs from the Magnolia Lane Memories and More card pack, added a few of the retiring Share What You Love bling. Now I love ribbon, so I added a little hint of white ribbon peaking out from under the top layer before adhering to the card base using Stampin' Dimensionals.

Such a pretty card and quite quick to make as well!

Are these Magnolia themed products calling out your name?

Until next time.
Margaret