Wednesday, October 2, 2019

In the Bullrush


At times when creating a card with a lot of white space one might think the card is very simple and basic. Yet, once you begin looking at the finer details you suddenly realize the time put into the final creation.


Today's card does have a lot of white space but let me tell you all the smaller details still took up quite a bit of time.  It was well worth it though as the result is a well balanced, eye catching card.

Several tools were used just create the elements on this card:

  • die cutting and embossing machine
  • embossing folder -Woodgrain (retired)
  • dies - Catch of the Day
  • ink - Memento Black, Soft Suede, Pool Party, Smoky Slate
  • stamp set - Best Catch
  • Stampin' Blends - Old Olive, Smoky Slate, Calypso Coral
  • cardstock - Smoky Slate, Mossy Meadow, Crumb Cake, Whisper White, Vellum
  • adhesive - SNAIL adhseive
  • Stampin' Dimensionals
  • Stampin' Sponges
  • marker - Early Espresso


One of the fun things for me when using coordinating stamp sets and dies is being able to stamp and colour a multitude of images, die cutting them and then settling in to create fun little works of art.

What is your favourite masculine set to play with?

Until next time.
Margaret 


Monday, September 30, 2019

Magnolia Embossed


Once I was head over heels for the Magnolia Lane suite I knew that I wished to add the Magnolia 3-D embossing folder to my stash of tools.


I sat down to create cards this weekend and used the embossing folder for the first time!!! Why did I wait so long?  The folder on it's own creates a stunning background but when you add a bit of colour, the image just pops!


I used Stampin' Up! Watercolour Pencils and a Blender Pen to add most of the colour, however I also used a Stampin' Blend to add just a hint of colour to the some of the edges of the flowers petals. I found this extra touch made the petals just pop!


I layered the embossed panel onto Basic Black cardstock that was barely larger than the cardfront. It gave just a hint of a shadow effect and to tie in the black colour, I used the Black 5/8" Glittered Organdy Ribbon. This ribbon is so beautiful!!! You will love it!

Next card I create using this will be a coloured cardstock so you can simply see the lovely effect the embossing folder creates on a card front :)

What is your favourite embossing folder to use?

Until next time!
Margaret 


Thursday, September 12, 2019

Magnolia Note Cards


No one ever said that cards had to be more than one layer.  If you are a beginner stamper you can start with a few simple supplies.

Today's design will show you how you can make cards with very few items. (note: I did use one sentiment from another set but you can easily make a set using only the sentiments from the Good Morning Magnolia stamp set.)


Supplies used:

  • Note Cards & Envelopes(used here are retired Crumb Cake) 
    • current available colours are Whisper White (131527), Very Vanilla (144236), Scalloped Note Cards (149610)
  • Good Morning Magnolia stamp set (149298)
  • Clear Block F (118483) & D (118485)
  • Soft Suede Ink (147115)

Simple steps to create:
  1. Fold Note Card in half
  2. Ink up large magnolia image using Soft Suede ink and stamp on card front
  3. Ink up sentiment you wish to use in Soft Suede ink and stamp on card front.
That's it and don't they look great! 

No one said you needed to break the bank to make cards :D

Until next time!
Margaret 


Tuesday, September 10, 2019

Most Wonderful Time Product Medley Tutorial Bundle


The new Holiday Catalogue 2019 features many great products to get you in the Holiday spirit. One such item is the Most Wonderful Time Product Medley (150705).  Purchase the Product Medley through me and receive a digital tutorial with 15 different projects*! The image above is a sneak peek :D  This is such a great way to get a jump start on all your holiday gift giving and card making needs.  

The Most Wonderful Time Product Medley includes stamps, paper, dies, and accessories that are perfectly coordinated for creating cards and more. A product medley is similar to our cardmaking kits and other project kits but without the predetermined projects. Also available in French and German.

Medley includes
* 11-piece photopolymer stamp set (clear blocks sold separately)
* 48 sheets of 6" x 6" (15.2 x 15.2 cm) Designer Series Paper, 8 each of 6 double-sided designs
* 12 gold foil card fronts, 4 each of 3 designs
* 6 sticker sheets, 2 sheets each of 3 designs
* Gold/white tinsel trim, 10 yards (9.1 m)
* 58 adhesive-backed gold faceted stars
* 6-piece Most Wonderful Time Dies (use with a die-cutting & embossing machine).

Product colors: Basic Black, gold foil, Old Olive, Real Red, white


Be sure to order soon so you have plenty of time to get all your crafting in before December arrives!!!

You'll love the projects featured in this tutorial package!!!

You may order the Medley directly from my on-line website at www.margaretsstamphaven.stampinup.net.  Be sure to allow your contact information to be visible to me so that I am able to share the tutorial with you <3

Until next time!
Margaret 


*Digital tutorial is solely for the use of the person who has purchased the Most Wonderful Time Product Medley directly from me.  You agree not to share this tutorial in any way, shape or form with anyone else.


Monday, September 9, 2019

Gone Fishing

I didn't jump on the Best Catch bandwagon right away when the set came out. Don't get me wrong, I really liked it and know some people who fish but I wasn't sure if I would end up using it as much as perhaps I thought I should.  As you can see though, I did break down and buy it.  The dies that coordinate with the stamp set certainly help make the card creation process so much easier. 


As I often do with other coordinating sets, I stamp, colour and die cut several images. From there I will design and build a card.

If you don't already own any of the Stampin' Blends, I highly recommend them.  The more you work with them the better you will get at blending, shading and simply colouring overall :D


As I am not always confident in my colour choices I did the one thing many of us do....I googled images of fish and other peoples creations to see how some of the fish looked.   I love using lots of colour as I find it brings the fish to life!!!


Now I truly appreciate the Copper Trim as this ribbon adds a perfect shimmering touch to just about any design.  When using it on a fish card such as, by simply stretching the ribbon out it looks a bit like a fish net. A simple yet cool technique.

Since this card says "For You, Dad" you could use if for any occasion really - birthday, fathers day, just because!! <3

Do you own this set already? Have you taken the time to sit down and create with it?

Until next time!
Margaret 


Monday, August 5, 2019

Suite Magnolia

The products in the Magnolia Collection are sweet! The items each on their own are beautiful but when combined together to create projects, the end results are stunning.

Today's featured card uses:

  • Magnolia Lane Specialty Large Cards & Envelopes
  • Magnolia Lane Memories & More Card Pack
  • Good Morning Magnolia stamp set
  • Magnolia Memory Dies


I could have used the first two products with some adhesive and Stampin' Dimensionals and still created a beautiful card but I love adding extra details.


I used the stamp set and Soft Suede ink to stamp the large magnolia image in the top right and bottom left corners of the card.


I stamped the smaller magnolia image using Versamark ink on Vellum Cardstock, added White Embossing Powder and heat set. Then I used Stampin' Blends to colour on the backside of the Vellum for a little depth and dimension.


Of course I just have to share with you a photo of the card with the envelope because the envelopes have a simple touch of detail as well.

With all the projects I have already shared using the Magnolia Collection, has this made it on your wish list yet?

Until next time.
Margaret 


Wednesday, July 31, 2019

Dancing into the teenage years

When a client of mine gave her daughter a card I had made for her 16th birthday and saw the reaction of her 12 year old, she knew she wanted to order a card for her youngest's upcoming 13th birthday as well.

Her daughter is very involved in dance so naturally she wanted to incorporate that in some way. I showed her the dancing woman in the stamp set Beautiful You and she loved the idea of incorporating that image into the card.


This card, like the previous one I made for her, is 5 1/2 x 8 1/2".

The base is Whisper White thick cardstock with a Layer of the beautiful, yet retired Wisteria Wonder. This layer was embossed with the stunning new Beads & Baubles Embossing Folder.


I love the stamp set Lined Alphabet and coordinating dies Layering Alphabet Dies. I used them here to add the birthday girls name.  Have you purchased these yet?  They are an investment but so worth it!

So I had to dig into my retired products to make this card just right and that meant pulling out my Large Numbers Dies.  I cut the numbers 5x and stacked them all together.  The top layer I smooshed in Versamark Ink, added Iridescent Ice Embossing Powder and heat set.


The final bit of detail on this card is the dancing woman from the set Beautiful You stamp set.  I stamped her in Memento Ink on Watercolour Paper and coloured her in using Stampin' Blends. I then fussy cut her and popped her up on the card front using Stampin' Dimensionals.

Thanks for checking out todays creation.

Until next time!
Margaret 

Thursday, June 20, 2019

Free As a Bird

There is something about the saying"Free as a Bird" that makes me happy. It evokes a feeling of being carefree without a worry in the world and when I look at the new stamp set with this name, it gels well with my thoughts.


I have been pushing myself to colour more and I can't begin to tell you how much I appreciate the Stampin' Blends.  The more I work with them the better I get at shading and blending.


These sweet birds were stamped on Whisper White Thick cardstock which works well with the Stampin' Blends.  If the cardstock is too thin or even buffered like the standard Whisper White cardstock, the alcohol markers simply do not work as well as they should.


This card needed to be vibrant, perfect for that friend who is bubbly and enthusiastic, which is why I chose Calypso Coral as my focal colour to make this card pop!

Did you know you can purchase the Free As a Bird stamp set, along with the Stitched Nested Label dies as a bundle for a savings of 10%?  The dies are double stitched...how cool is that!  The negative die cut is also stitched so you can create stitched windows in your cards.  I having been using this die set like crazy.


A little bling always adds a perfect touch so I pulled out the Happiness Blooms Enamel Dots and finished the card up with these edible looking dots.


Was this set on your wish list when you received your catalogue?

Until next time ~
Margaret


Tuesday, May 28, 2019

Mini Shipping Box - Belly Band Seal

I can't believe this is the last week for the current annual Stampin' Up! catalogue and next week you all have the opportunity to begin purchasing new products from the 2019-2020 Annual Stampin' Up! Catalogue.  The fun continues for me with creating projects using the Good Morning Magnolia set and the Magnolia Memory Dies.


I chose to create a different project today and so I used the cute Stampin' Up! Mini Shipping Boxes that will be available in the new catalogue.


I really didn't want the box sealed where the recipient would have to damage the item when they open it so a belly band was the perfect solution as a seal.


The possibilities of designs for belly bands are endless but I do find the white and pink colours of the magnolia go so well with the craft colour of the boxes.

The Magnolia Lane designer series paper has so many great patterns that it took me a bit to settle on which pattern to use for the belly band itself.  I attached this to Basic Black cardstock to allow the designer paper to stand out.


Die cutting the smaller magnolia image from one of the sheets of designer paper was a no brainer for me to add some great colour to the project.


I still needed depth for this project, so I die cut the magnolia petals and stamen, layering them using Whisper White, Petal Pink and So Saffron cardstock.  To create dimension I used a Bone Folder to curl the petals.  Once all layers were ready I used SNAIL adhesive to attach each layer together.


Of course a project is never really complete until some type of bling is added.  This is where the Clear Faceted Gems came in handy.  I added a medium sized gem to the centre of the flower. Let's not forget about the cute sentiment.  'Hello' was stamped in Memento Black ink and die cut using the incredibly versatile Stitched Nested Label Dies.


Flowers never seem to appear right unless they have some leaves and the sweetest leaves are die cut using the Magnolia Memory dies.  Did you know that the set includes two identical larger and two identical smaller leaf images?  This is great for mass die cutting.  You get twice as many cut in the same amount of time it would take you to die cut one set.


The boxes are larger than I thought they would be and will be perfect for adding mini note cards inside as a little thank you gift for a hostess or even a unique birthday gift for a special friend.


What would you put in these adorable Stampin' Up! Mini Shipping Boxes?

Until next time ~
Margaret 


Wednesday, May 15, 2019

A Mothers Love

Okay, so I am going to do this to you two days in a row!   After this card, I am done sharing Mother's Day cards with you (for awhile at least).

Yesterday I shared with you the card I made for my mom for Mother's Day and today I am sharing a card that I made for my oldest daughter.  She became a mom on Christmas Eve 2017 and she works hard to ensure her little guy is cared for, loved, nurtured, fed and safe.  She is a wonderful mom and I wanted to be sure she knew how proud we are of her.

I spent nearly 2 full hours creating this card for her because I wanted it to be just right! From the cardstock colour on each layer to the placement of each Pink Pearl.


There are many small details that you may not even notice at first glance but lets take a walk through this card and have a look.

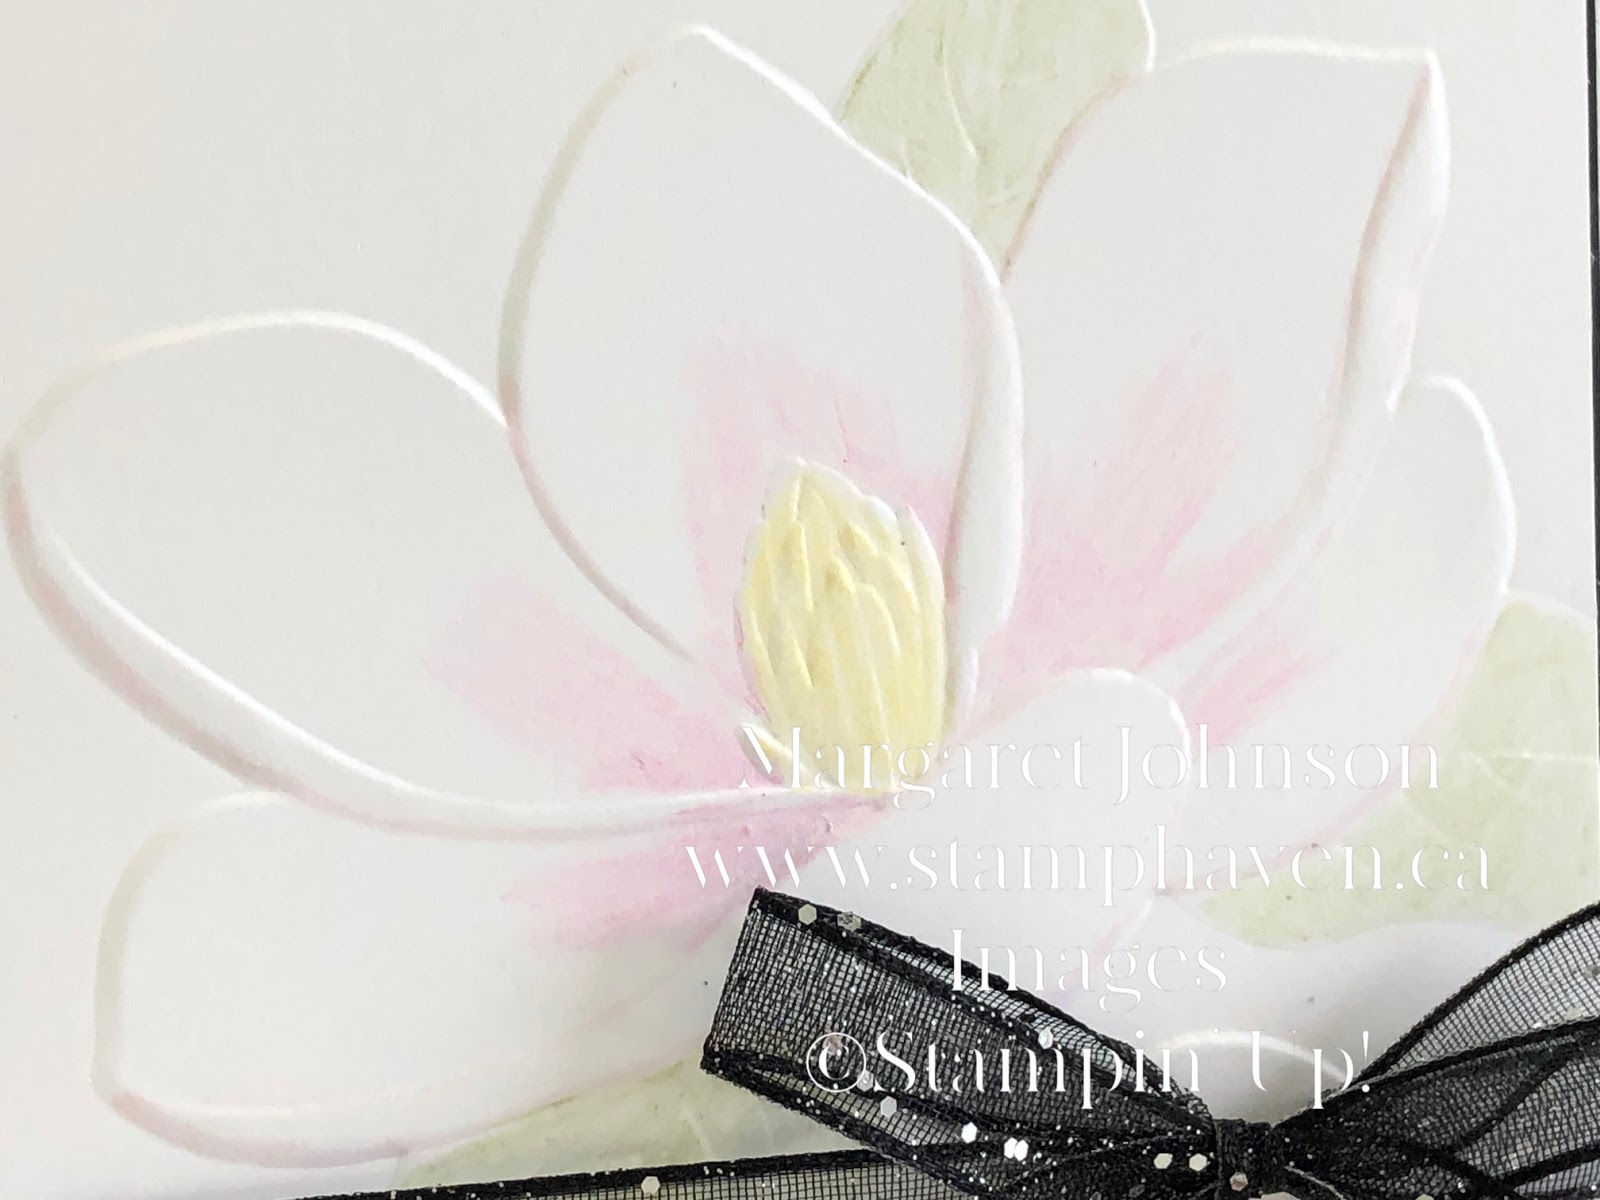
So the very first thing I did was stamp, colour and die cut the large magnolia image from the Good Morning Magnolia stamp set. The outline was stamped using Soft Suede ink.  Then I used my Stampin' Blends to colour in the flower.  If you're not aware, Stampin' Blends are alcohol based which means you need to stamp your outline in a waterbased ink so that the lines don't disappear while colouring.


I used a few colours (both light and dark Blends) to achieve this result:

  • Petal Pink 
  • Old Olive
  • Crumb Cake
  • Daffodil Delight
Now I won't lie, I don't feel I'm the best at colouring images, but I am super proud of how well the flower turned out.

My next step was deciding on the card base colour.  I chose Crumb Cake as it is such a perfect neutral colour and helps tie in the Crumb Cake branch in the image.  I added a second, slightly smaller layer of Crumb Cake cardstock but for this layer, I added some embossed line details.  Do you know, it has been so long since I used my Simply Scored tool that I had to check to see if it was still available for purchase in the catalogue!  I pulled that bad boy out and used it to create the line details.


I had planned to use the gorgeous Magnolia Lane Designer Series Paper but I found it too busy or not the right balance of pattern and colour to go with the magnolia image.  Back to the drawing board I went and decided to try out a few different colour cardstocks, embossed using the Subtle Texture Dynamic Embossing Folder.  I picked the Petal Pink as the right fit for this card.


Next was ribbon and while this particular ribbon has been retired for years, I really wanted to use the old Victorian Lace (I believe that was the name of this particular design).  Next, I took 1/8" braided Linen Ribbon and pulled apart the braid, leaving the ribbon looking like loose threads.  I adhered these bits under the die cut magnolia image for an added vintage touch.


Of course I wanted to add a Mother's Day Sentiment so I stamped the Happy Mother's Day from the set Tea Together using Memento Black ink and die cutting using the Stitched Shapes Framelits. 


The final touch on this card was the Share What You Love Pearls. Soft and delicate, not overwhelming.


I don't tend to make such "detailed" cards, shall we say and while this card took me a couple hours to make, I am so proud of the finished product.

What is the longest amount of time you have spent making one card?

Until next time.
Margaret 


Tuesday, May 14, 2019

Mother's Day... celebrating my Mom!

How blessed we are to celebrate our Mother! While those of us who still have a mother in our lives are fortunate to spend time with them, I also feel for those who have lost their mom and struggle on this day.

My husband and I took my parents out for a nice dinner on Saturday evening.  Really after nearly 80 years, what does your mom really need other than her childrens time?

Now since I love making cards, and even though my mother by her own admission to me in the past told me that she does not keep my cards, I sat down Saturday morning to create a special card just for her.

Now I don't really want to tempt or tease you with products from the new 2019-2020 Stampin' Up! catalogue just yet, I also don't want to wait a few weeks just to show you Mothers Day cards. So don't get too excited over these products yet because I still have plenty of projects to share with you using retiring items.

For this card, I used the Magnolia Lane Memories and More Card Pack.  I was going to use the Magnolia Lane Card and Envelope pack as well but couldn't bear the thought of covering up the silver outline on the card base.


The leaf layer that is attached to the Whisper White Large Memories and More card base is actually printed Vellum!  This paper is sooooo pretty.  The images were simple black outlines, so I added colour to the leaves by using Old Olive Stampin' Blends.

You may have noticed that I do like to use the stamp set Well Said that coordinates with the die set Well Written.  These products are available in the current Occasions catalogue as a bundle at 10% off. Just a reminder that while these products will be carried over to the new catalogue, they will no longer be available as a bundle at the discount, so if these are on your wish list, I recommend ordering them now ;)


I stamped Mother's Day and die cut the word Happy and added them to one of the smaller designs from the Magnolia Lane Memories and More card pack, added a few of the retiring Share What You Love bling. Now I love ribbon, so I added a little hint of white ribbon peaking out from under the top layer before adhering to the card base using Stampin' Dimensionals.

Such a pretty card and quite quick to make as well!

Are these Magnolia themed products calling out your name?

Until next time.
Margaret 


Monday, May 13, 2019

Friendship....A Million Little Things

Throughout life we make friends all the time and while some friendships are fleeting for whatever reason, others last a lifetime even when you don't get to chat or visit as much as you'd like.  My friendship with Angela is one of the latter.

I met Angela October 2008. She had responded to a newspaper ad I ran about a World Cardmaking Day event I was hosting. She was relatively new to the 'area' (she lives 45 minutes away from me) and was thrilled to find a Stampin' Up! demonstrator close by.  The moment I met Angela in person I knew I had found a new friend for life.  Her presence alone and beautiful smile just draw you in and you feel God's love emanating from her.

It has been a bit since I have had a chance to visit with Angela and being the bad friend that I am, I failed to send her a birthday card yet again this year, even after I promised myself I would make sure she received one this time!


I knew it was time to make her a very special card to let her know what her friendship means to me. While I typically struggle with creating a watercolour wash background, I gave it yet another whirl and was thrilled with the result.

Now if you haven't seen the Butterfly Beauty dies in the Occasions Catalogue, they are absolutely beautiful and while I could have die cut two different images that layer over top of each other, I wanted to create a 'shadow image' instead by die cutting in black only.


The card needed some texture and a bit of bedazzle, so I pulled out the Shimmer Embossing Paste and the handy dandy masks that allow you to add designs to your cardfront and added just a bit. I wrapped Whisper White Bakers Twine around the cardfront several times and tied in a simple bow. I stamped my sentiment "Our friendship isn't one big thing" in Memento Black ink and die cut using Stitched Shapes dies.


The top layer is attached to a black matte which in turn has then been adhered to my Old Olive base.  I added a layer of Whisper White cardstock on the inside to make it easier to write on. I also stamped the latter half of the cards sentiment which was "it's a million little things".

I mailed the card off and while Angela doesn't live all that far away it took nearly 2 weeks before she received it.  I was itching to post the card but didn't want to do that until I knew she had it.
 
Until next time.
Margaret 


Tuesday, May 7, 2019

Entertainment wants to Impress, Hospitality Wants to Bless.

Last week a co-worker stopped by my desk to chat and she mentioned a saying she had heard on a podcast that she wanted to remember. She determined that if she shared with someone right away, she had a better chance at remembering it. The saying really is meaningful and the moment she shared it with me I knew that I wanted to create a special piece of artwork that could be framed and hung on her wall to remind her of the saying.

"Entertainment wants to impress, Hospitality wants to bless". 


This was the saying she heard on a podcast by Jen Wilkin from Flower Mound Bible Study.  The point of this saying is to remind us not to stress over having a clean home when visitors pop by. I think it comes natural to us to want our home to be neat, tidy and clean because we worry about how others perceive us.  However, when people come to visit, it is not to see the state of our home but rather to spend time with us.  Hospitality is about our guests, sharing our time and ensuring we are caring for their needs, not our own needs.


I was very excited to begin work on this project and Saturday I focused on designing and creating a wall art piece that would be a gentle reminder not to sweat having a clean house for guests.

I won't deny it, I did use some recently retired Designer Series Paper that had been available during Sale-A-Bration but I think you might agree that it adds a beautiful touch of colour.


While I could have hand stamped each letter to create the saying I did not have the style lettering available in my stamp collection, so instead I created the saying in a Word file using fonts that I believed would help make the words stand out.

You also notice around the outside of the center matte that I added some butterflies. These were punched out using the Butterfly Duet punch. I'm so happy I purchased this punch!


While I forgot to take a photo of my packaging, I used the retired set Swallowtail to stamp butterflies over Kraft Paper which I used to wrap the frame in.

My co-worker was thrilled with the gift . My heart is happy that God has blessed me with the ability to be creative with paper and share my passion with others, if but in a small way.

Until next time.
Margaret 

Monday, May 6, 2019

Incredible Like You Mini Note Cards

The sun is shining, I have a bit of a tan on my face after a gorgeous day yesterday and ... my legs are still Casper white.  I think I'll need to work on a base tan on my legs so I don't scare everyone this summer when I start wearing shorts more!

I had a couple hours to work in my stamp room this weekend and I realized how behind I am on posting projects that I have had completed for awhile now. Oops.


I love making little Thank You cards. They are so handy to have ready when the occasion arises. Today's sweet note cards were created using the oh so pretty set Incredible Like You from the Occasions Catalogue. Sadly this set is retiring and will no longer be available after May 31st.


I love how well this DistInktive set inks up and stamps. While I did do a bit of fussy cutting to pop up the flower it really took no time at all.

I used a few different colours for these cards but have to say that they way Real Red shows up is my favourite.

Did this stamp set capture your eye when you saw it?

Until next time!
Margaret 


Monday, April 29, 2019

Life is Tough but so are you!

Where did the weekend go? I spent most of it cleaning and enjoying time with my family.  Time is definitely the best gift we can give one another and when a friend suddenly suffers a stroke, it brings it all in perspective how quickly life can change and how important it is to make time for those that are important to us.

I took some time to create a card that reflected our friends passion, which is drag racing.When Stampin' Up! came out with the Geared Up Garage bundle, all my friends immediately turned to me and said, "oh, this set is right up your alley!".  I was so excited since I am a drag racer myself and I have many friends who are involved in racing or simply into old cars.


While a Ford would not be my first choice (it actually is one of my last choices), the die image and stamp image reflect a Mustang so I went along with it. Both our friend, as well as myself, race Chevy's and while their is some designer series paper with a '55 Chevy on it, I stuck with the die cut as I was in a hurry.

The gears were die cut from Gold Foil paper. I love the way the foil papers really make the gears stand out. The burn out splatter was stamped in Smoky Slate and the Mustang was popped up over it using Stampin' Dimensionals.


I stamped the tool box in Memento Black ink on Real Red cardstock and die cut using the Garage  dies, tucking it slightly into the gears.

The sentiment is from the retiring stamp set, Friendly Expressions and was stamped in Memento Black Ink.


I hope this card gives our friend some encouragement during a time where he faces some new challenges in life.

Do you have a go to set that you use for sentiments when it comes to thinking of you cards? What is it?

Until next time.
Margaret